

Installing a kitchen backsplash is one of the most effective ways to improve both function and style in a cooking space. For many people, knowing how to install tile backsplash can feel intimidating, but with clear planning and the right steps, it becomes something approachable and rewarding. Today’s best step‑by‑step guides emphasize preparation, layout planning, correct adhesive use, and careful finishing to make sure the end result not only looks great but lasts.
Backsplash tile does more than protect walls from splashes and stains. It completes the look of cabinets and counters, adds texture or color, and creates a visual anchor within the kitchen design. Recent reviews and renovation articles show that homeowners are turning to thoughtfully designed backsplash work as a way to both personalize space and boost property value.
This guide walks through every part of the backsplash installation process, from tools and prep to grouting and finishing. Each section explains what needs to be done and why it matters so that the job feels doable rather than overwhelming.
Why Backsplash Tile Remains A Core Kitchen Feature
A tile backsplash sits against the kitchen wall above counters and behind sinks and stoves, where daily use leaves walls most prone to spills and splatters. A properly installed backsplash tile surface protects these vulnerable areas, keeping water, oil, and food residue off drywall and paint surfaces where damage can occur. Modern tile materials also bring texture, color, and visual rhythm into the room, making the backsplash an integral design element rather than a simple functional add‑on.
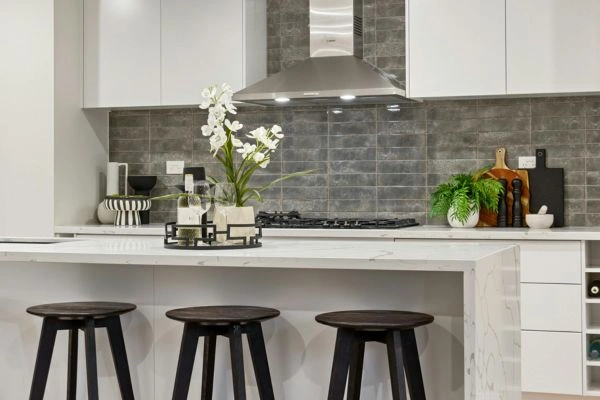
Experts in kitchen design emphasize that a backsplash is one of the most noticeable aspects of a renovation because it ties together contrasting finishes like countertops and upper cabinets. While trends like full stone slabs are emerging, traditional tile backsplashes remain popular due to their versatility and the vast range of patterns and materials available.
Whether you choose classic subway tile, natural stone, or a mix of materials, the right backsplash can elevate a kitchen’s look without overwhelming it, and it can be installed piece by piece to fit most skill levels.
Choosing Materials and Tools For Success
Before starting any backsplash project, gather the tools and materials you will need so everything is at hand as you work. The basic tools most guides recommend include a tape measure for accurate dimensions, a level to keep tiles straight, a notched trowel for spreading thinset, spacers for consistent joints, a tile cutter or wet saw for edge cuts, a grout float, a sponge, and buckets for mixing.
Selecting the right tiles matters for both look and ease of installation. Smaller tiles like classic subway pieces are often easier for beginners to set and adjust, while larger tiles cover more area quickly but require very flat walls and careful handling. Ceramic and porcelain tiles usually offer the best mix of durability, ease of cleaning, and variety of styles.
It’s also wise to buy more tile than you think you’ll need. Most guides recommend calculating the square footage of the backsplash area and adding about ten to fifteen percent extra to account for cuts and mistakes. Having a little extra tile on hand avoids delays and makes it easier to match patterns and colors.
Safety accessories like eye protection and gloves keep the work comfortable and help prevent injury during cutting and setting.
Preparing Your Kitchen For Tiling
Before any tile goes on the wall, the area needs careful prepping. This begins with clearing counters, removing outlet covers, and cleaning walls to remove grease, dirt, and loose paint. Grease and residue can prevent adhesives from bonding properly, so a thorough cleaning is one of the most important early steps.
If there is an old backsplash or leftover adhesive on the wall, it needs to be removed so that the new tiles sit flush. Rough or uneven surfaces make it difficult to keep tiles level and aligned. Sanding or skim‑coating uneven spots helps create a smooth, flat surface that improves adhesion and the end look.
A chalk line or laser level is often used to map out the first horizontal row on your wall. Starting from a level line keeps tiles straight across the area, which is especially important for smaller backsplash tiles where misalignment becomes more obvious.
Planning Your Tile Layout Before You Begin
Planning tile placement before applying any adhesive is one of the most common recommendations from installation experts. Taking time to lay out your backsplash tiles on a countertop or table helps identify where cuts will be needed and ensures that tile patterns look balanced across the wall.
Determine where the middle point of the backsplash area is and align the pattern around it, or position tiles based on a focal point such as a stove or window. Starting in the center often produces a balanced look on both sides. Other methods focus on beginning tile placement at a point that keeps small edge slivers to a minimum.
Good layout planning prevents common mistakes like having uneven cuts or awkward tile positions near corners, cabinets, or electrical boxes. Once you know where full tiles and cut tiles will go, you’ll be ready to move to the next step confidently.
How to Install Tile Backsplash: Step-By-Step
Measure and Mark Your Work Area
Measure the width and height of the backsplash area and calculate the square footage to know how much material you need. This includes accounting for outlets and obstacles in the wall. Multiply width by height to find total area, then add a waste allowance to ensure enough tiles are on hand.
Mark the height where the backsplash tile will end, often below cabinets or where the wall changes texture. Draw horizontal chalk lines along this height to guide your first row of tiles.
Apply Adhesive Carefully
Mix your tile adhesive or thinset according to package directions for proper consistency. Using a notched trowel, spread small sections of adhesive onto the wall at a time so it won’t dry out before tiles are placed. Press tiles into the adhesive with a slight twist to ensure good contact.
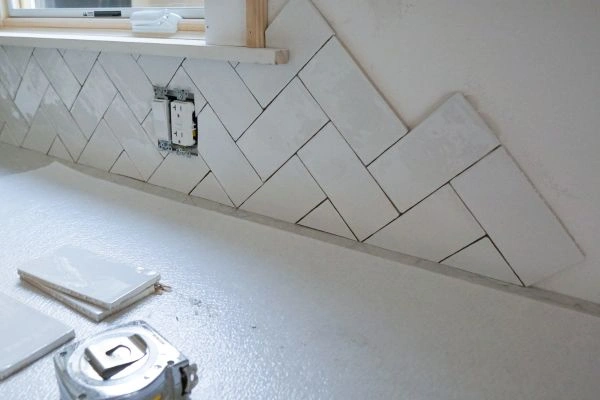
Position spacers between tiles to maintain even grout joints, and check frequently with a level that the tiles stay straight. Work methodically from one section to the next without rushing.
Tiles that require cutting should be measured precisely to fit neatly around outlets, edges, and fixtures. A wet saw or tile cutter gives clean edges and makes it easier to fit tiles snugly in these spaces.
Let Adhesive Cure Before Grouting
After all tiles are set, let the adhesive dry fully according to the manufacturer’s instructions before grouting. Full curing usually takes about 24 hours and ensures that tiles won’t shift as grout is applied. Rushing this step can weaken the bond and create long‑term issues.
Grouting And Finishing Details
After the adhesive has fully set, it is time to prepare the grout. Mixing the grout according to the manufacturer’s instructions ensures the proper consistency, which makes it easier to work with and helps prevent cracking later. Using a grout float, press the grout firmly into the joints, making sure each gap is filled. Incomplete filling can allow water and dirt to seep in, potentially causing damage over time. It is important to work in small sections and wipe away excess grout from the tile surfaces with a damp sponge before it dries. This keeps the tile clean while ensuring that the joints are smooth and even.
Once the grout has dried, applying a grout sealer adds a layer of protection against stains, moisture, and mold. Sealing is particularly important in kitchen areas where splashes and spills are common. The sealer not only prolongs the life of the grout but also makes regular cleaning easier and more effective. Along edges where the backsplash meets countertops, cabinets, or walls, flexible caulk should be applied. Caulk allows for slight movement caused by changes in temperature or settling, preventing cracks and gaps that could compromise the finish.
For a polished final look, inspect the backsplash closely after grouting and sealing. Remove any haze from the tiles using a soft cloth, and double-check grout lines for uniformity. Small touch-ups can make a significant difference, giving the backsplash a professional, seamless appearance. Paying attention to these finishing details ensures that the backsplash is not only attractive but also durable and easy to maintain over the long term.
Common Backsplash Installation Mistakes and How to Prevent Them
One of the most frequent mistakes homeowners make during backsplash installation is rushing the layout planning. Poorly planned layouts often result in narrow or uneven cuts at edges and corners, which can look awkward and unprofessional. Taking the time to dry-lay tiles or create a mock-up of the pattern on a countertop allows adjustments before adhesive is applied. Careful planning ensures that full tiles are centered and that edges and corners are balanced, reducing the likelihood of noticeable flaws in the finished backsplash.
Grouting before the adhesive has fully cured is another common error. If grout is applied too early, tiles can shift, causing uneven joints and long-term issues with adhesion. Waiting for the recommended curing time ensures that tiles are firmly in place, allowing grout to settle properly without stress on the adhesive bond. This step is crucial for the longevity of the backsplash and prevents costly repairs or reinstallation in the future.
Choosing the wrong type of grout or using incorrect joint widths can also lead to problems. Grout that is too rigid or not formulated for kitchen environments can crack, shrink, or fail under moisture exposure. Similarly, spacing that is too wide or too narrow can affect both the look and durability of the backsplash. Following manufacturer recommendations for the specific type of tile and adhesive being used helps avoid these issues and ensures a professional, lasting finish.
Caring For Your Backsplash After Installation
Once your backsplash tile is installed, regular care ensures it stays looking fresh and maintains its protective function for years. Ceramic, porcelain, and glass backsplashes are generally low-maintenance and respond well to mild soap and warm water. Wiping down the surface a few times a week prevents grease and dirt from building up, keeping the tiles shiny and clean without much effort. For natural stone tiles like marble or travertine, occasional sealing is necessary to prevent staining and moisture absorption, preserving both appearance and durability.
Grease and food splatters can accumulate quickly, particularly behind stoves, sinks, and other high-use areas. A soft sponge or microfiber cloth combined with a gentle cleaner is usually all that is needed for everyday maintenance. For stubborn spots, let a mild cleaning solution sit for a few minutes before wiping to lift grime without scrubbing aggressively. Avoid abrasive pads or harsh chemicals, as these can scratch the tile surface or damage grout lines, leading to long-term wear or discoloration.
For grout care, it is helpful to occasionally apply a grout cleaner or a mixture of baking soda and water to remove residue and maintain its bright appearance. Sealed grout resists stains and moisture more effectively, but even sealed grout benefits from periodic cleaning to prevent dullness or discoloration. Using a small brush or toothbrush for grout lines ensures that hard-to-reach corners are thoroughly cleaned without risking damage to the tile.
In kitchens where splashes happen frequently, setting a weekly routine for backsplash maintenance can save time and prevent buildup. Quick, consistent care keeps the tile backsplash looking like new and reduces the need for more intensive deep cleaning later. Over time, properly maintained tile and grout continue to protect your walls, preserve your investment in the kitchen, and enhance the overall design of the space.
Final Thoughts On Successful Backsplash Installation
Knowing how to install tile backsplash starts with careful preparation and continues through thoughtful pattern planning, proper adhesive application, and patient finishing. With these steps, a kitchen backsplash becomes not just a protective surface but a defining piece of design that blends function with style.
From choosing the right tiles to avoiding common pitfalls, current guidance helps ensure that even DIYers feel equipped to take on this project without stress or mess. With clear instructions and a bit of patience, any kitchen can gain a refreshed look that lasts for years.